 AI, Plainly
Deep Dive · January 15, 2026
Preserving the Past While Revitalizing It: AI and Photo Restoration
Originally published on my Spartina website on January 15, 2026, and updated May 6, 2026.
Most of us have boxes, albums, or envelopes of old photographs tucked away somewhere: family portraits, snapshots from vacations, candid moments that exist nowhere else. Over time, these images fade, scratch, discolor, or simply fail to live up to what we remember seeing with our own eyes. Sometimes the problem isn’t age at all, but the limitations of the camera, film, or lighting used at the moment the photo was taken.
The question this raises is simple but loaded: how do we responsibly breathe new life into these images without losing their authenticity?
The problem: revitalization without revisionism
Traditional photo restoration has always walked a careful line. Cleaning up dust, repairing tears, and correcting obvious color shifts are generally accepted as restoration. But at what point does restoration become alteration?
This question has become more contentious with the rise of AI-based tools, especially generative AI. For many people, AI in media creation triggers understandable skepticism: fears of fabrication, historical revisionism, or the subtle rewriting of visual truth. These concerns are not misplaced. AI is extremely good at inventing plausible details, and that power cuts both ways.
The goal of responsible photo restoration, however, is not to improve history, but to recover what was plausibly there and make it visible again.
A brief look at traditional approaches
Before AI, restoration was largely a manual craft. Tools like Photoshop gave restorers fine-grained control:
- Healing and clone tools to remove dust and scratches
- Manual color correction and tonal balancing
- Layer-based workflows to preserve non-destructive edits
These methods are powerful and precise, but they are also time-consuming and require significant skill. For many people, the barrier to entry is simply too high. As a result, countless photos remain unrestored, not because they can’t be improved, but because doing so is impractical.
What AI changes, and what it shouldn’t
AI-based photo restoration tools offer something genuinely new: accessibility. Tasks that once took hours can now be done in seconds. Faded faces can be clarified, noise reduced, contrast restored, and even resolution increased enough for modern displays and prints.
But this convenience comes with responsibility.
Used carelessly, AI can:
- Invent facial features that were never there
- Over-sharpen skin and textures into something unnatural
- Apply modern aesthetic biases to historical images
Used thoughtfully, AI can instead:
- Enhance clarity without altering structure
- Recover contrast and tonal range lost to aging or poor exposure
- Improve legibility while keeping the original character intact
The difference is not the tool. It’s the intent and the process.
Principles for responsible AI photo restoration
To use AI in a way that respects the original, a few guiding principles help keep things grounded:
- Start with the best possible scan. AI cannot fix what isn’t captured. High-resolution, well-lit scans preserve maximum information and give both manual tools and AI better material to work with.
- Favor enhancement over invention. Avoid tools or settings that add details rather than clarify existing ones. If an AI model is guessing, that should be a conscious choice, not an invisible default.
- Work incrementally. Apply AI enhancements in stages and review each step. Subtle improvements compound; heavy-handed ones distort.
- Keep the original untouched. Always retain the unmodified scan. Restoration should be reversible in principle, even if the tools themselves are not.
- Be transparent about what was done. Especially when sharing restored images, it matters to say how they were produced. Transparency builds trust.
AI vs. Photoshop: a false dichotomy
It’s tempting to frame this as a choice: AI or traditional tools. In practice, the best results often come from using both.
AI excels at:
- Noise reduction
- Global enhancement and upscaling
- Recovering faces and textures degraded by time
Manual tools excel at:
- Fine local corrections
- Artistic judgment
- Enforcing restraint where automation might overreach
In a thoughtful workflow, AI becomes an assistant, not an author.
Why this matters
Photographs are more than images; they are personal and cultural records. When we restore them, we’re not just improving pixels. We’re shaping how the past is seen and remembered.
Used carefully, AI can help preserve those memories, making them accessible to future generations without rewriting their story. Used recklessly, it risks turning documentation into interpretation.
The challenge, and the opportunity, is to use these powerful new tools with humility, clarity of intent, and respect for the originals.
A concrete example: restoring a photo of my father
To make this discussion less abstract, the rest of this article walks through a real example from my own family photo collection: a photograph of my father taken decades ago. The original print is physically intact but shows the familiar signs of age: softness, tonal flattening, and subtle discoloration. It is also limited by the quality of the original camera and film.
I chose this image deliberately. Personal photographs raise the stakes. They are not just historical artifacts; they are emotionally loaded. Any restoration choices made here need to feel respectful, restrained, and honest.
Step 1: Digitization, starting with a faithful capture
To show how much the capture method matters, I digitized the same print two ways.
The first was an Epson FF-680W, a fast feed scanner. It is convenient and a good choice for working through a big box of prints. The second was a DSLR camera setup:
- Camera: Nikon D5100
- Lens: Macro lens suitable for flat-field reproduction
- Lighting: Even, diffuse lighting to avoid glare and texture exaggeration
A camera-based scan has a few advantages when done carefully: higher effective resolution, better control over focus and exposure, and the ability to capture subtle surface detail without the harshness some scanners introduce.
The first row of the figure under Step 3 shows the two scans side by side. Neither has been touched up, so the difference comes entirely from the capture, which is why it comes first in the workflow. Whatever the scan leaves out, nothing downstream can bring back.
The goal at this stage was not to make the image look good. It was to make it accurate. Any errors introduced here would be amplified downstream.
Step 2: A light touch in Lightroom
As a conventional baseline, I ran the DSLR scan through Lightroom’s automatic enhancements, with very minimal processing. It is the kind of quick pass anyone with photo software can make, and it shows what you get without any AI at all.
The result looks slightly better, but it still clearly shows its age and limitations. That is as far as I took the manual tools.
Step 3: AI restoration with two prompts
I then turned to AI-based restoration, using a tool that, as of January 2026, represents the current state of the art for photographic restoration. I won’t name it here; the point of this section is the process and the outcomes, not brand promotion.
I gave it the raw DSLR scan, not the Lightroom version, so its results can be compared directly with the original. I ran that scan through it twice, with two different prompts:
- A preservation prompt, which asks for a conservative, preservation-first restoration. It permits only removing dust and scratches, gentle correction of fading, and cropping away everything outside the photograph. It forbids colorizing, sharpening, adding detail, and any change to faces.
- An enhancement prompt, which asks for a conservative but fuller restoration. Besides repairing damage and cropping, it permits subtle sharpening of existing detail and gentle, period-appropriate colorization in muted colors. It still forbids any change to faces and any invented detail, and it says the colors are speculative interpretations, not recovered facts.
Here are both prompts exactly as I used them. Click an arrow to read one.
The preservation prompt
Perform a conservative, preservation-first restoration of the attached vintage photograph.

Your objective is to repair visible photographic damage and remove extraneous material surrounding the photograph, NOT to enhance, reinterpret, or recreate the image. The restored photograph should look nearly identical to the original, except for the removal of damage, correction of obvious deterioration, and necessary cropping or alignment corrections.

PERMITTED CHANGES
- Remove clearly identifiable dust, scratches, spots, and physical blemishes.
- Correct obvious fading or uneven exposure using gentle, global tonal adjustments.
- Make only minimal adjustments to brightness and contrast where necessary.
- Preserve the photograph's original grain, softness, texture, and historical appearance.

CROPPING AND ALIGNMENT
- Identify the boundaries of the original photographic image. Remove unwanted borders, scanner margins, album pages, surrounding surfaces, and other clearly extraneous content outside those boundaries.
- Apply minimal rotation to correct a tilted scan or capture. Apply perspective correction only when the physical photograph was clearly photographed at an angle.
- Base alignment corrections on the photograph's physical edges, not on assumptions about whether people, buildings, or horizons within the scene should be straight.
- Crop only as much as necessary to isolate the core photographic image and remove empty edges introduced by alignment corrections.
- Preserve all original scene content, including people, clothing, objects, and background details near the edges. Do not crop for aesthetic improvement or tighter framing.
- Preserve the original photographic image's proportions. The overall file dimensions and aspect ratio may change as necessary to remove surrounding material, but do not stretch or compress the image.
- Do not use generative fill, content-aware expansion, or invented imagery to replace corners or edges. If an alignment correction would require sacrificing meaningful original content, reduce or omit that correction.
- If you cannot confidently distinguish extraneous material from original photographic content, preserve the uncertain area.

STRICTLY PROHIBITED CHANGES
- NO COLORIZATION. If the original is black and white, the output must remain black and white. If sepia, retain its original sepia appearance. Do not introduce new colors or change the original color palette.
- NO SHARPENING OR DETAIL ENHANCEMENT. Do not increase facial definition, edge contrast, texture, or apparent resolution through invented detail.
- NO FACIAL MODIFICATIONS. Preserve every person's facial features, proportions, expression, eyes, nose, mouth, wrinkles, hairline, and apparent age exactly as they appear in the source photograph. Do not reconstruct, beautify, smooth, or regenerate faces.
- Do not change clothing, hairstyles, poses, backgrounds, objects, or lighting.
- Do not alter the scene's composition except for the limited cropping and alignment corrections explicitly permitted above.
- Do not invent or replace missing visual information.

RESTORATION PRIORITIES
1. Exact preservation of people's faces and identities.
2. Preservation of all original scene content and the original photographic appearance.
3. Careful removal of extraneous surrounding material and correction of capture misalignment.
4. Removal of obvious physical damage.
5. Gentle tonal correction only where necessary.

If an improvement risks altering any original visual detail, leave that area unchanged.

Generate one restored image, preserving the source image's resolution and visual character as closely as possible, with dimensions adjusted only as needed for the permitted cropping and alignment corrections. The desired result is a carefully cleaned and properly aligned historical photograph, NOT a newly generated version of the original.
The enhancement prompt
Create a conservative, historically faithful enhanced restoration of the attached vintage photograph.

Your objective is to repair visible damage, make modest improvements in clarity, and introduce subtle, period-appropriate colorization while preserving the original photograph's content and character.

This is a restoration of an existing photograph, NOT a recreation or reinterpretation of the scene.

PERMITTED CHANGES
- Remove visible dust, scratches, stains, spots, and other physical damage.
- Correct fading, uneven exposure, and tonal imbalance using restrained adjustments.
- Apply subtle sharpening only where it improves the clarity of existing details. Do not generate or invent new details.
- If the photograph is black and white or sepia, apply gentle, realistic colorization using muted, historically plausible colors.
- Maintain natural skin tones, lighting, shadows, and photographic textures.
- Preserve the photograph's original grain and softness wherever possible.

CROPPING AND ALIGNMENT
- Identify the boundaries of the original photographic image. Remove unwanted borders, scanner margins, album pages, surrounding surfaces, and other clearly extraneous content outside those boundaries.
- Apply minimal rotation to correct a tilted scan or capture. Apply perspective correction only when the physical photograph was clearly photographed at an angle.
- Base alignment corrections on the photograph's physical edges, not on assumptions about whether people, buildings, or horizons within the scene should be straight.
- Crop only as much as necessary to isolate the core photographic image and remove empty edges introduced by alignment corrections.
- Preserve all original scene content, including people, clothing, objects, and background details near the edges. Do not crop for aesthetic improvement or tighter framing.
- Preserve the original photographic image's proportions. The overall file dimensions and aspect ratio may change as necessary to remove surrounding material, but do not stretch or compress the image.
- Do not use generative fill, content-aware expansion, or invented imagery to replace corners or edges. If an alignment correction would require sacrificing meaningful original content, reduce or omit that correction.
- If you cannot confidently distinguish extraneous material from original photographic content, preserve the uncertain area.

STRICTLY PROHIBITED CHANGES
- NO FACIAL MODIFICATIONS. Preserve every person's facial features, proportions, expression, eyes, nose, mouth, wrinkles, hairline, and apparent age exactly as depicted. Do not reconstruct, beautify, smooth, or regenerate faces.
- Do not change hairstyles, clothing styles, poses, body proportions, or expressions.
- Do not add, remove, reposition, or replace any people, objects, or background details.
- Do not invent missing visual information or introduce artificial textures.
- Do not apply excessive sharpening, smoothing, HDR effects, or modern photographic styling.
- Do not crop, reframe, or change the original aspect ratio.

COLORIZATION GUIDELINES
- Use restrained, natural-looking colors appropriate to the apparent historical period.
- Avoid overly saturated colors, dramatic contrast, or modern cinematic effects.
- Where original colors are unknown, use muted, plausible colors. These choices are speculative interpretations, not recovered historical facts.
- Colorization must change only the color appearance, not the underlying shapes, textures, or details.

RESTORATION PRIORITIES
1. Exact preservation of facial features and identities.
2. Preservation of all original scene details and composition.
3. Conservative removal of visible damage.
4. Subtle, historically plausible colorization.
5. Modest sharpening and tonal improvement.

If any enhancement risks changing a person's face or another original visual detail, leave that detail unchanged.

Generate one high-quality restored image that looks like the original historical photograph, carefully cleaned and naturally colorized—not a newly generated photograph.
For comparison, I also kept the one-click automatic enhancement built into the Epson scanner’s software. That is the result most people would get without doing anything else, so it is a useful baseline. It was applied to the Epson scan, not the DSLR one.
The versions side by side
Here is the photograph at each stage, in three rows. Click any picture to see it larger.
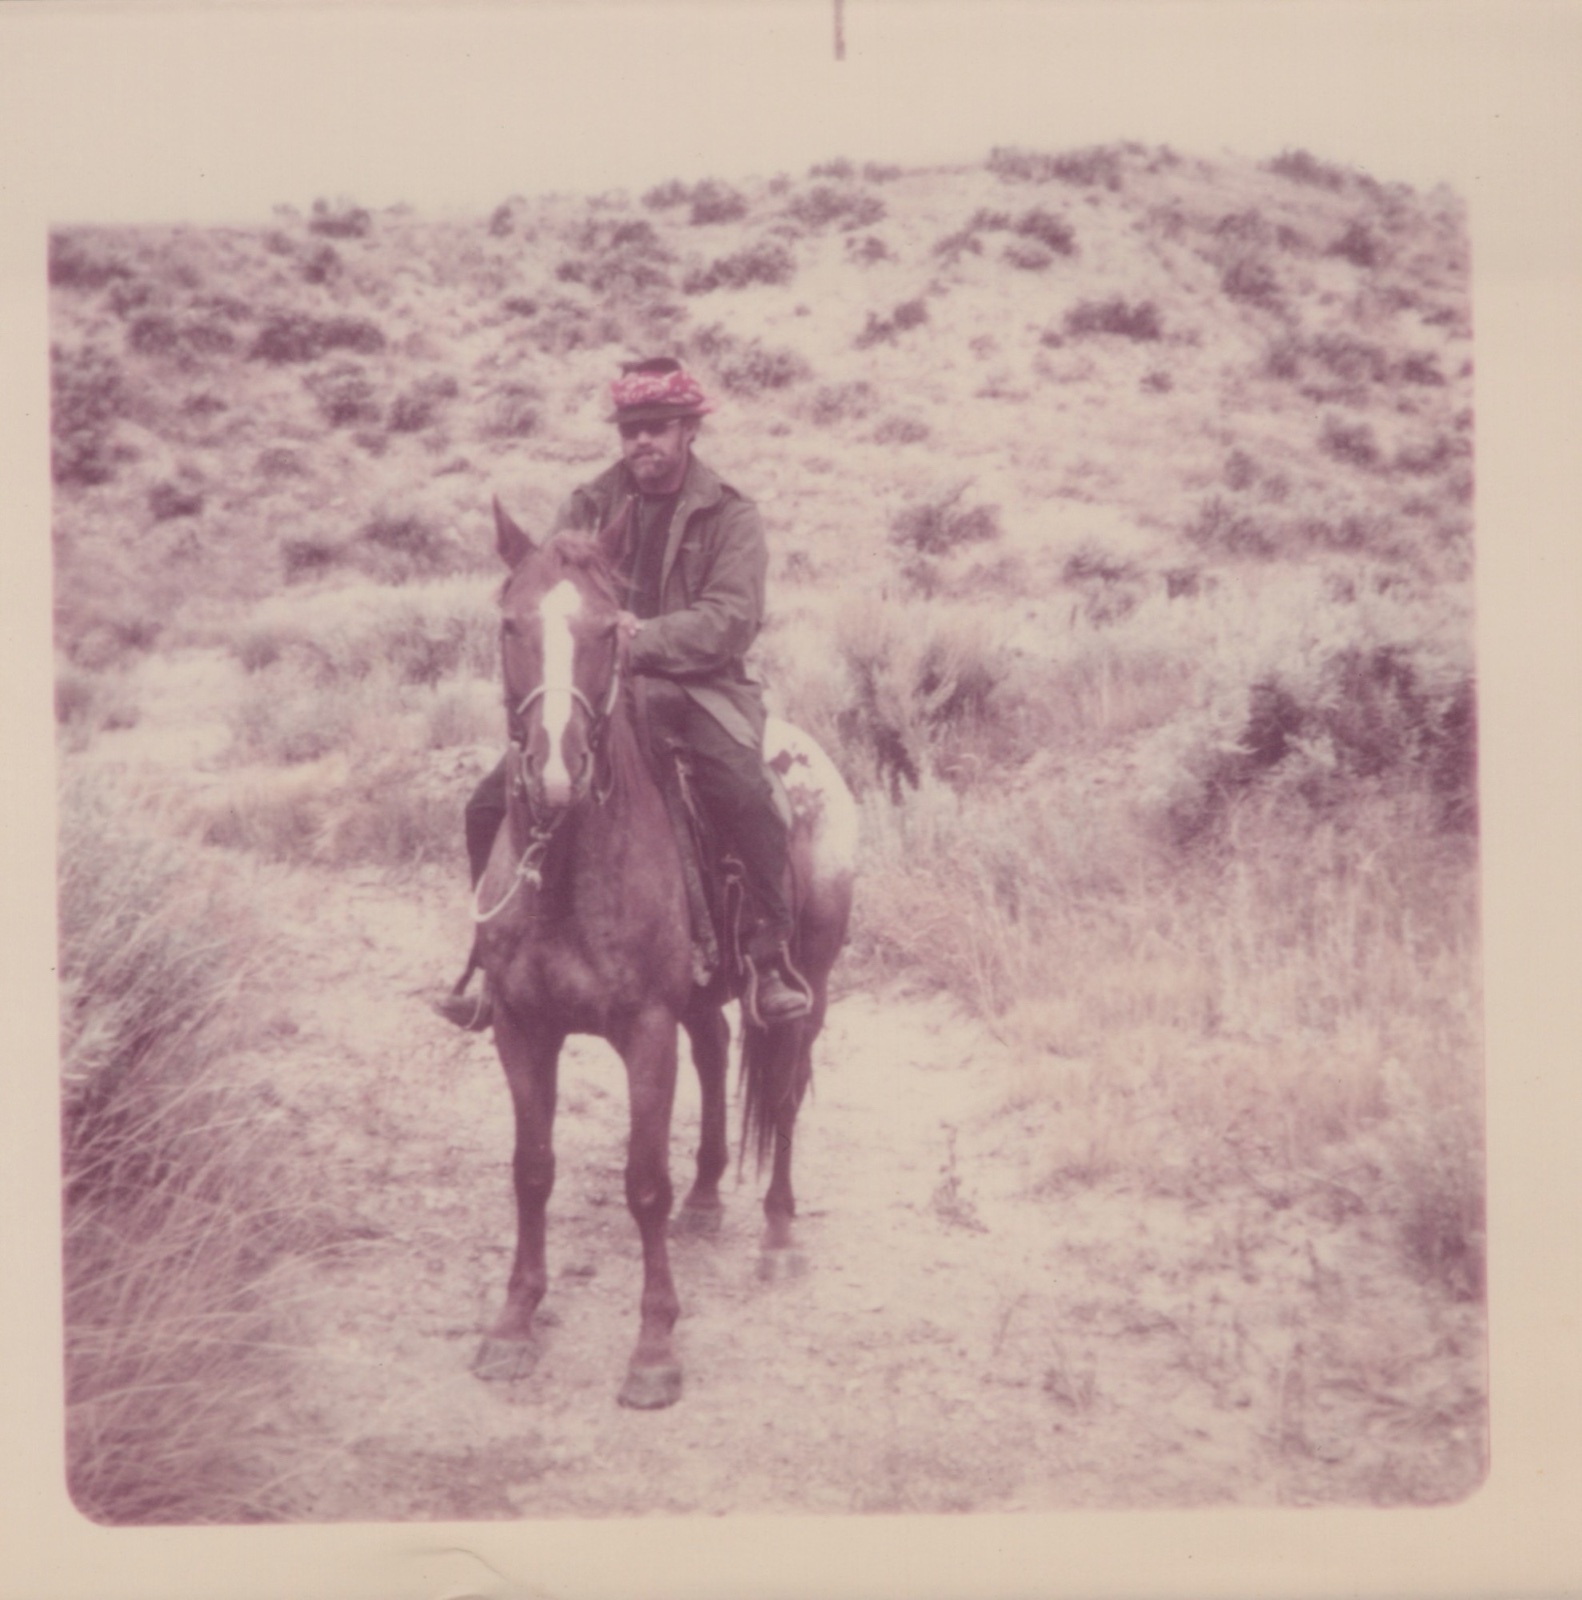
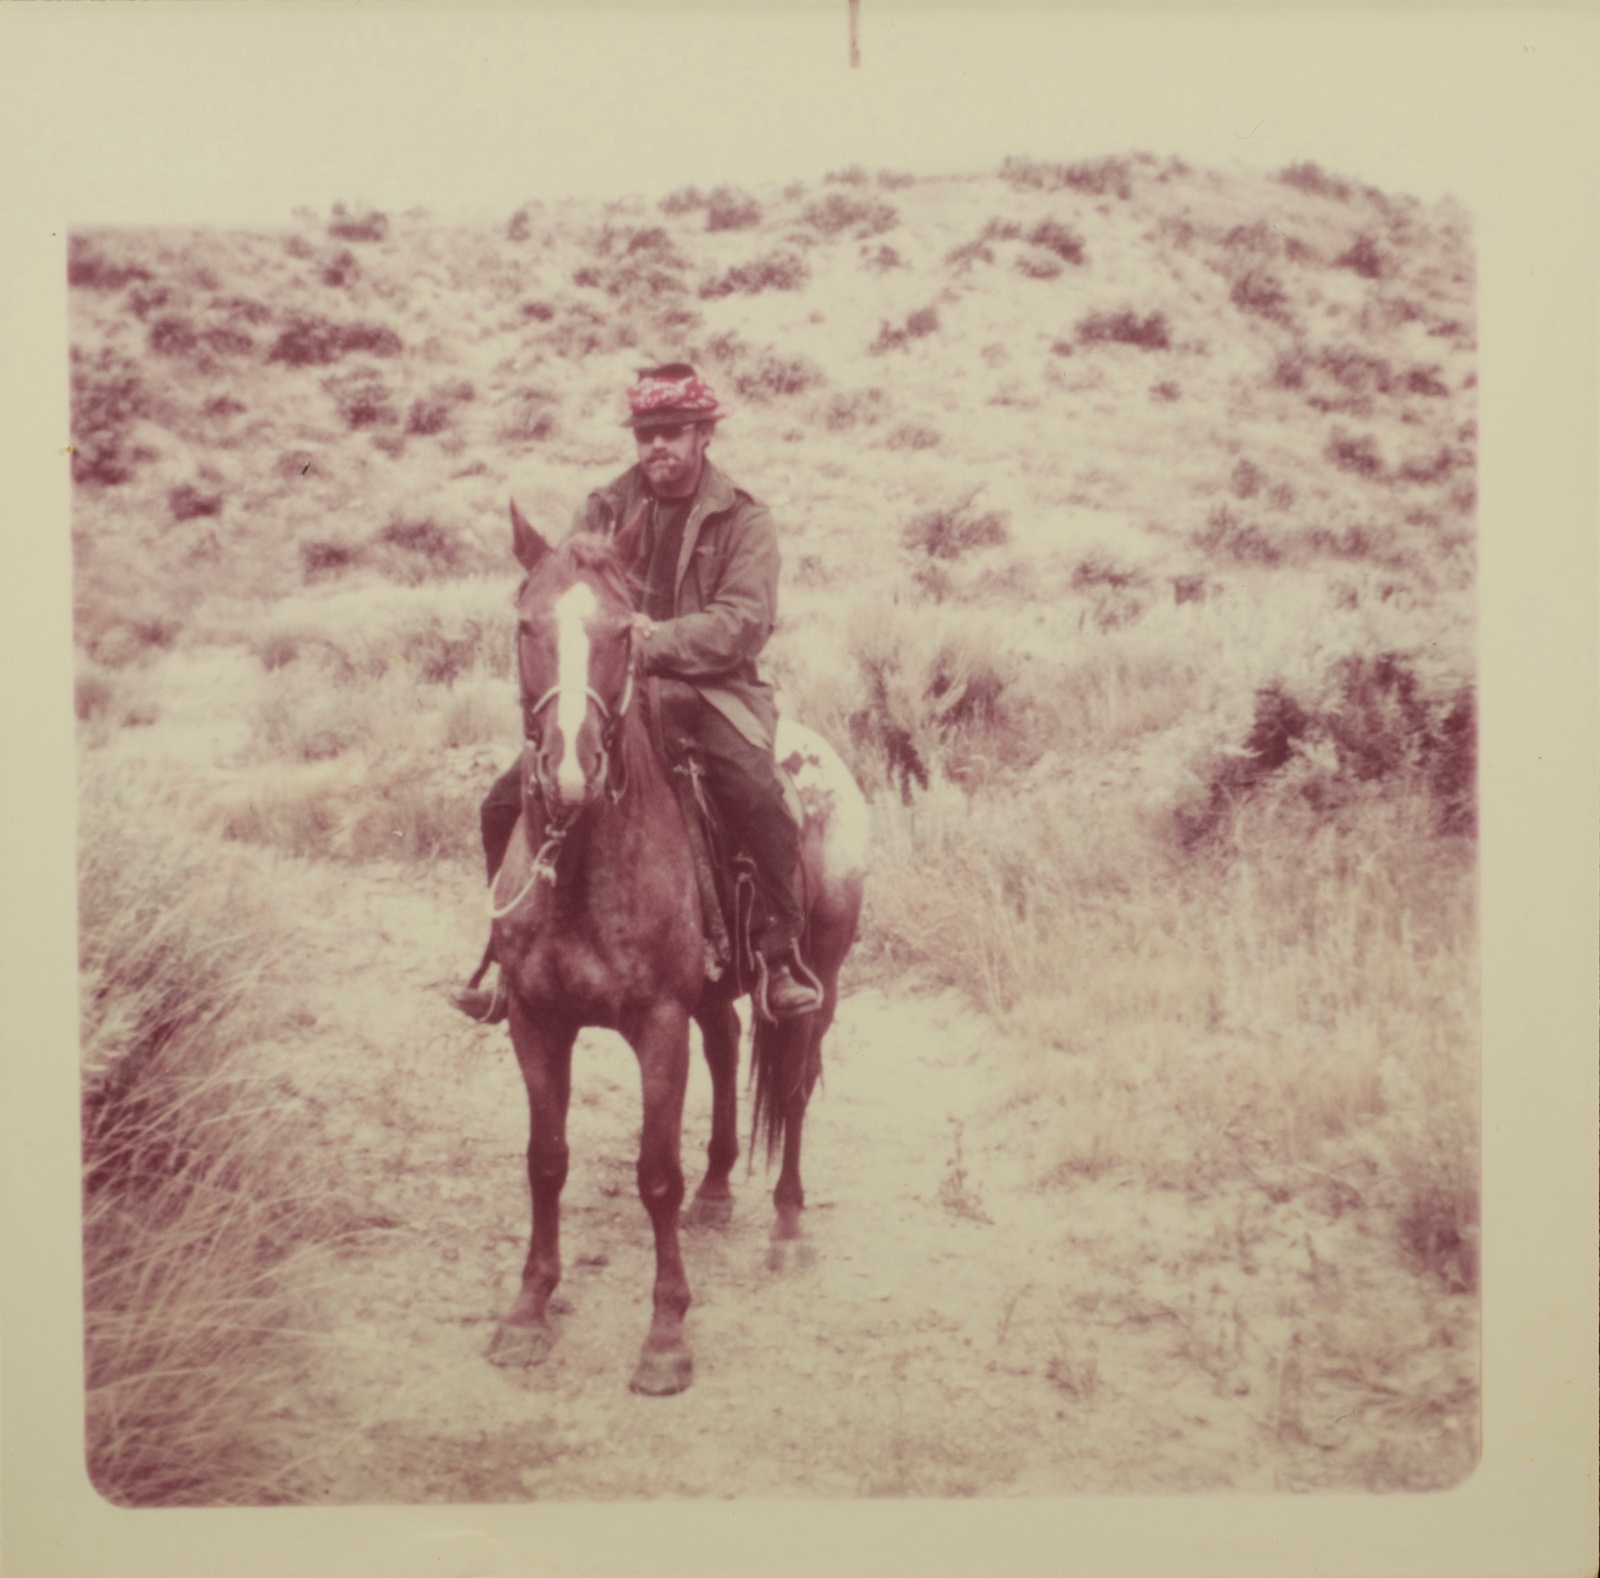
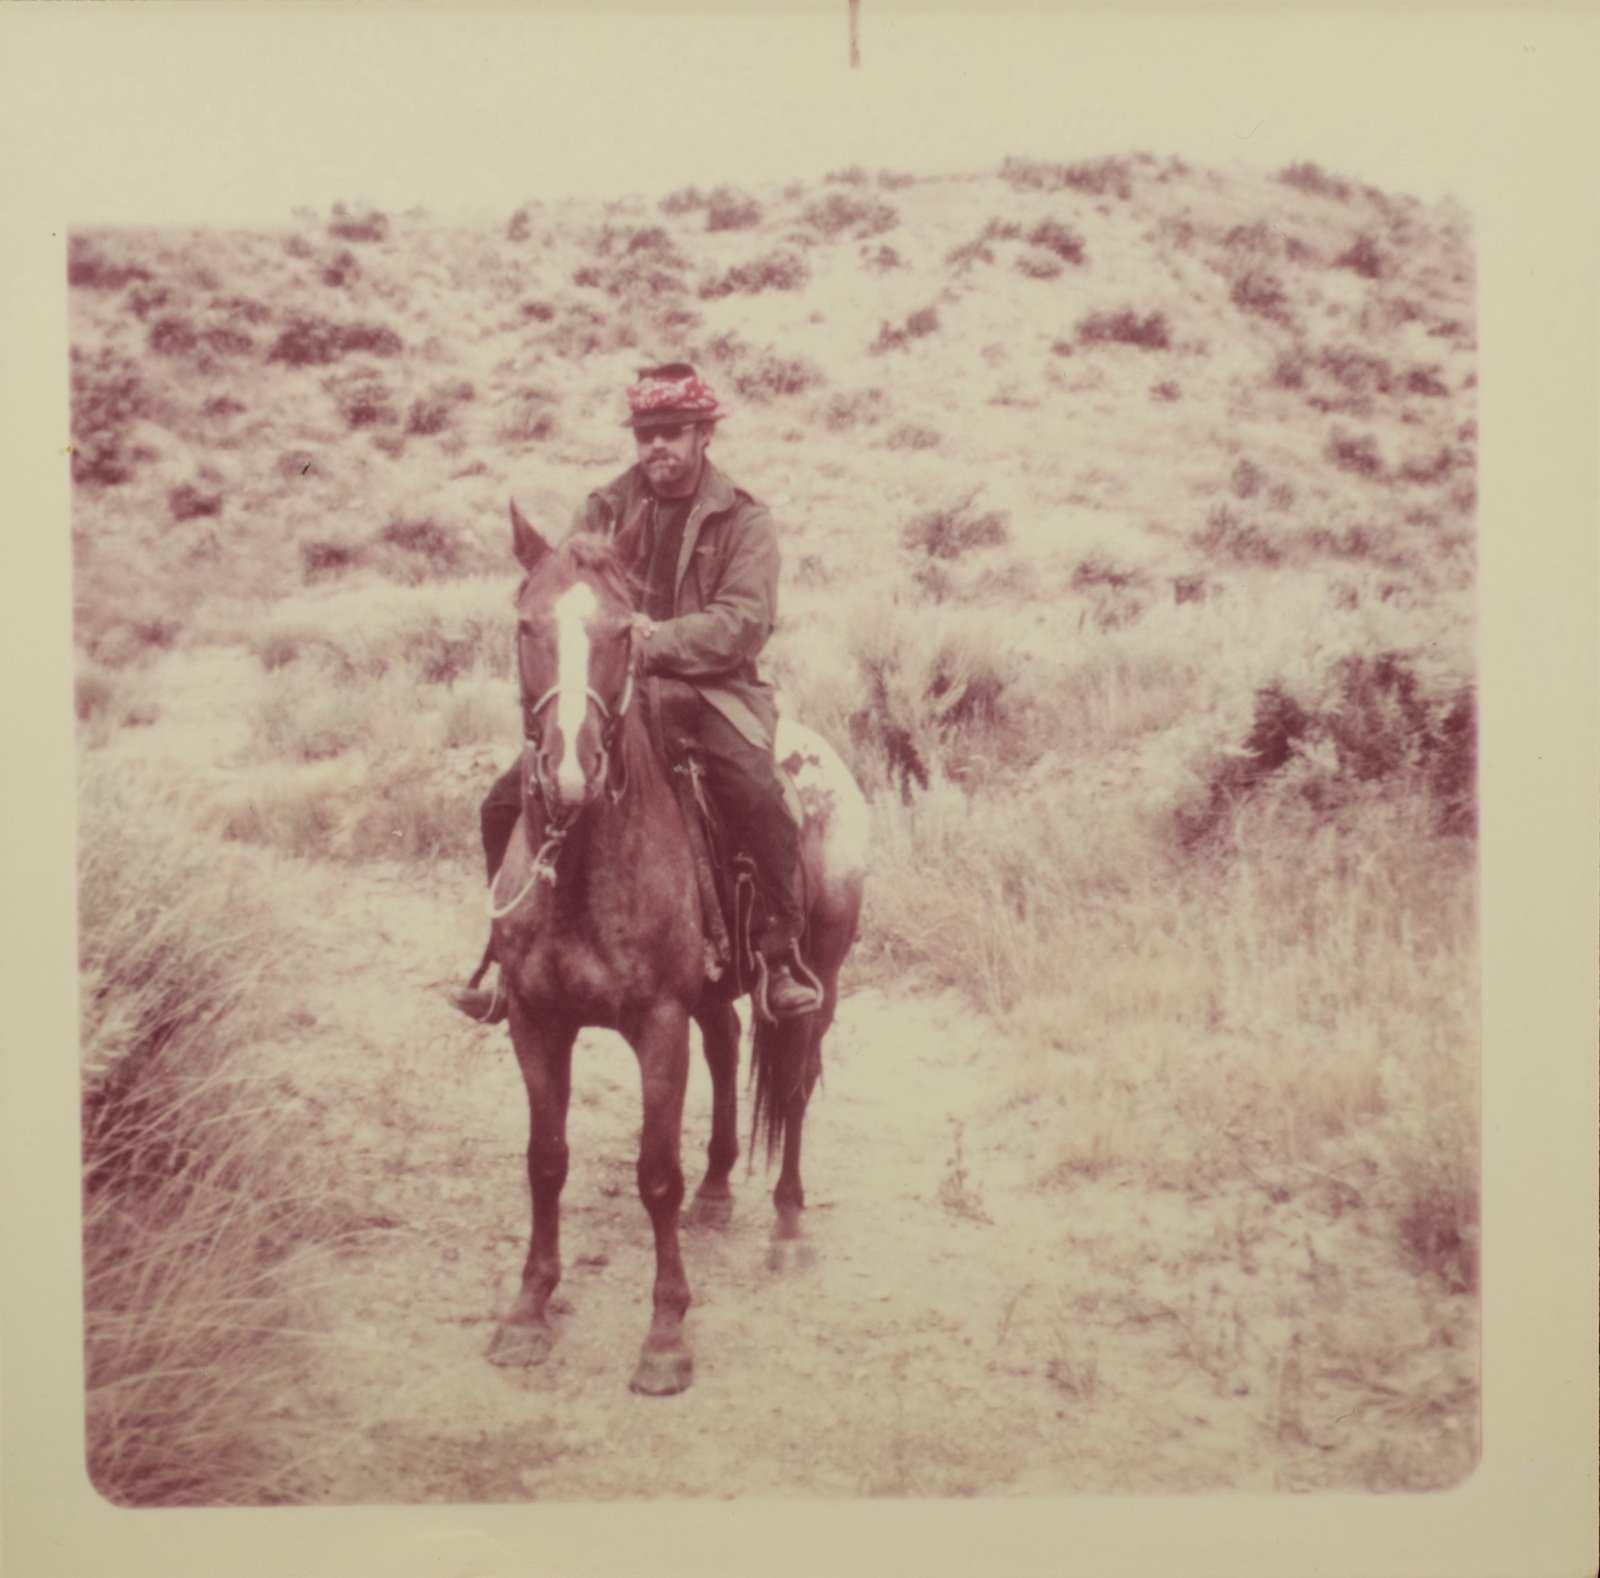
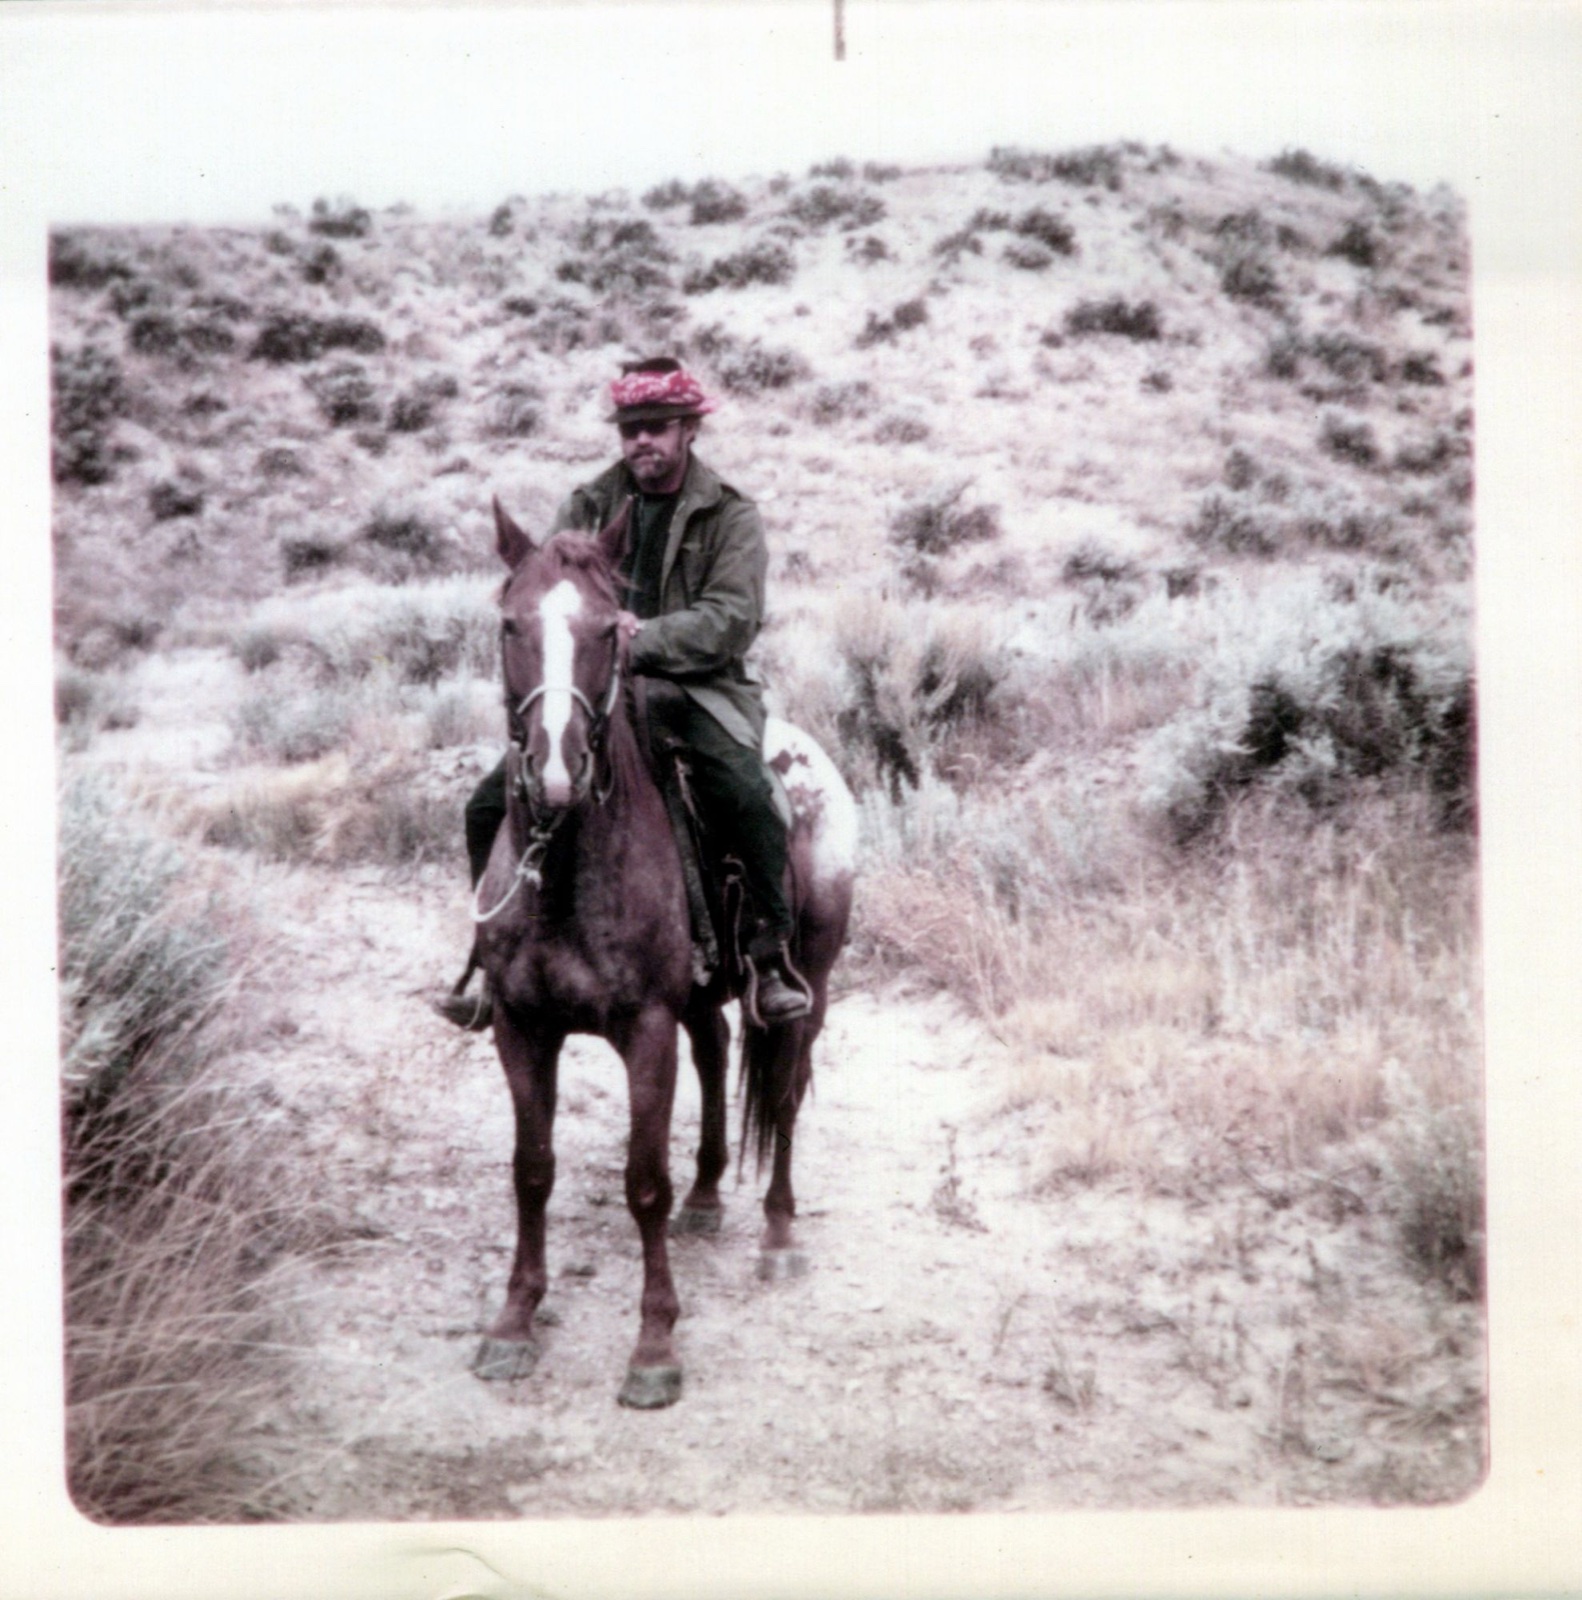
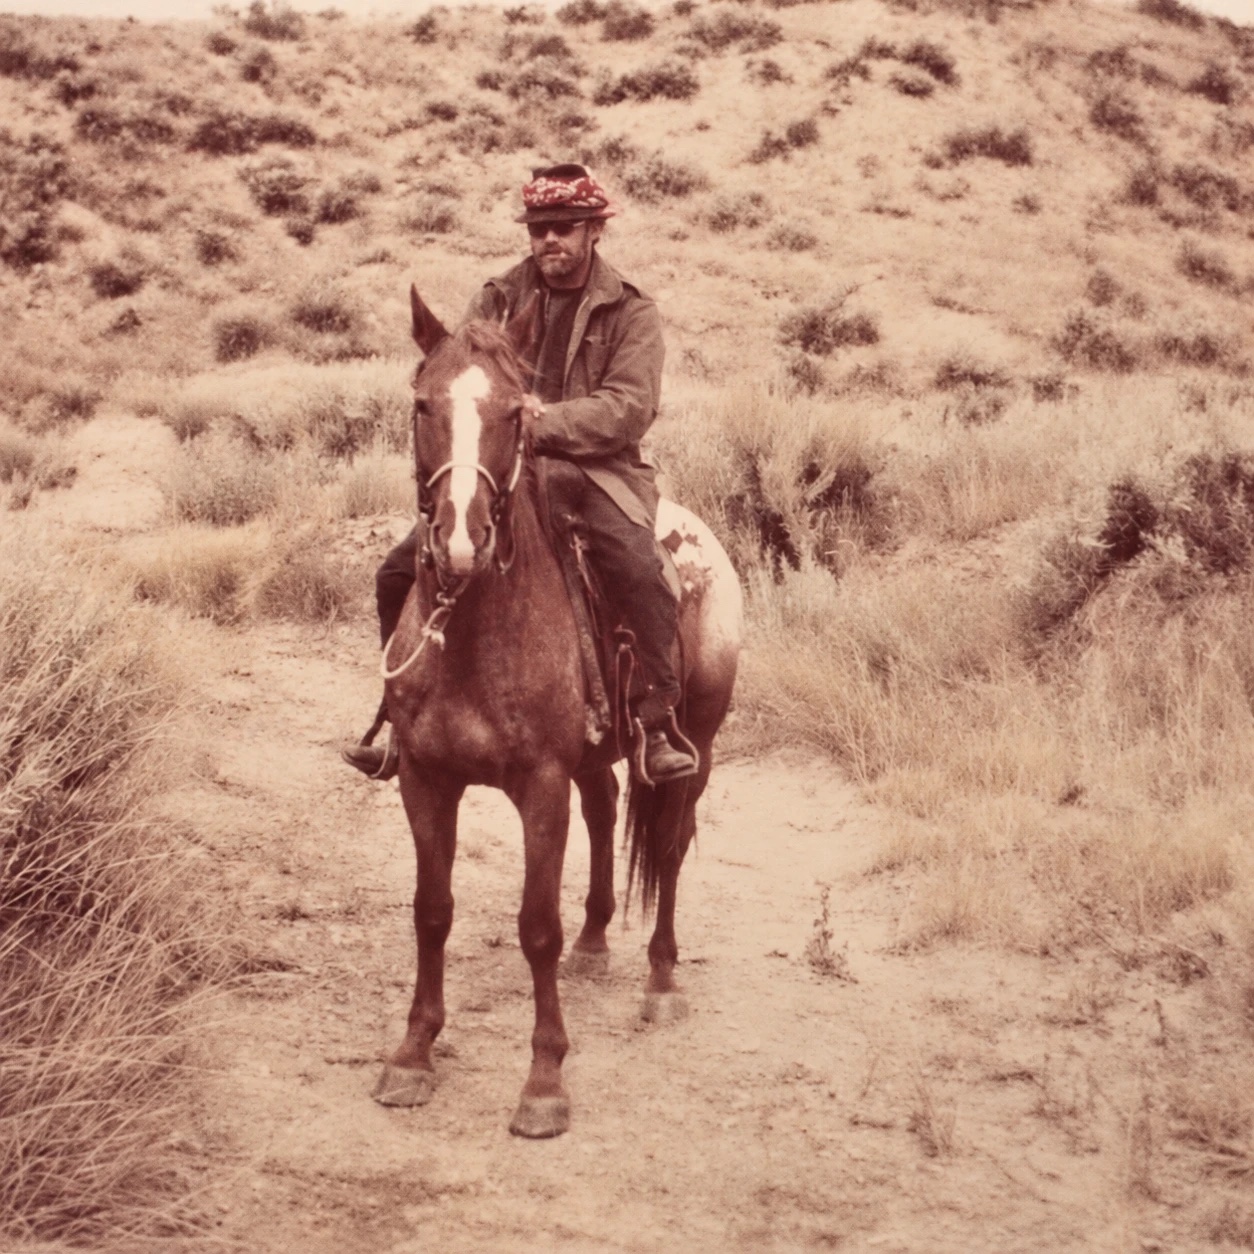
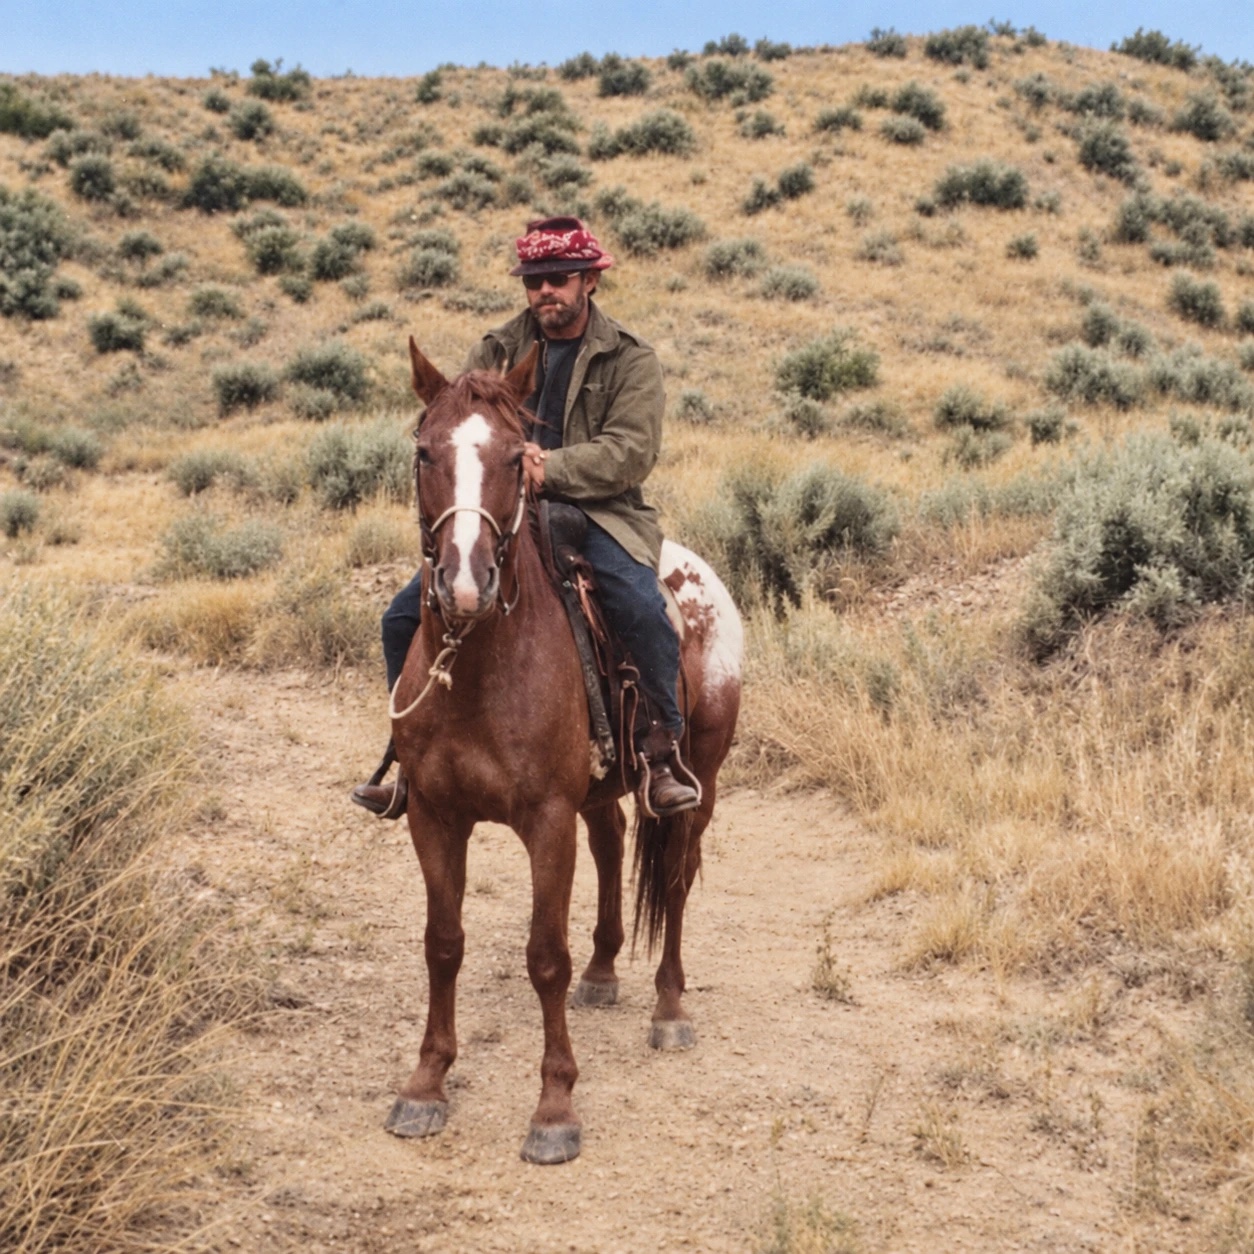
Figure 1. My father’s photograph. Row 1: the two originals. Row 2: the two conventional enhancements. Row 3: the two AI results.
Comparing the results
The differences are easy to see and worth thinking about.
- The two originals show how much the capture matters. The Epson feed scan is softer and hazier, with a heavy pink cast. The DSLR scan holds more information: the texture of the brush and ground, the pattern on the hat, and the horse and rider are all easier to read, and the color is closer to the warm cream of an aging print. Either way, the print is faded and has a visible border, and the colors we might expect from a sunny day on a trail are mostly gone.
- The Lightroom automatic enhancement barely changes the DSLR scan. It adds a little contrast and tidies the tones, and the border is still there. That is what “very minimal” looks like.
- The Epson automatic enhancement adds contrast and a stronger pink-and-white look, but the softness and the border remain. It is more dramatic than helpful, and it brings out no new detail.
- The AI preservation version is the same photograph, cropped and balanced. It is warm and muted, it reads as an old photograph, and the rider, the horse, and the hillside are much easier to make out.
- The AI enhancement version is the most striking. The sky is blue, the brush is green, and the horse, the rider’s jacket, and his red bandana have strong, natural-looking color. Everything looks sharper and closer to what a modern camera would record.
That last point is exactly where the caution from earlier applies. The enhancement prompt itself asks for muted colors and calls them speculative, and the result is still far more vivid than that. Nothing in the original tells us the true color of the sky, the brush, or the clothing. The rider’s dark trousers, for example, have become blue jeans. Those colors are plausible guesses, and the added sharpness is the tool’s interpretation of soft detail. A result that looks more real is not necessarily more accurate.
The two AI results also show how much the prompt matters. The same photograph, from the same tool, produced a faithful result and a vivid one, depending on what I asked for.
This is where human judgment becomes essential. I compared each AI result not just to the others, but back to the original scan and to my own memory of the subject. Where a change felt plausible but not faithful, I treated it with suspicion.
What I keep, and why
I keep all of it. The original scan stays untouched, which is my first principle. The AI preservation version is the one closest to what the print itself shows. The AI enhancement version is the one I would show to family, because it is the most enjoyable to look at, and I would always label it as enhanced and share it alongside the others.
This arrangement reinforces a central argument of this article: AI should assist restoration, not replace judgment.
What this example illustrates
This single photograph demonstrates several broader points:
- High-quality digitization matters more than the choice of AI tool
- Minimal manual cleanup before AI improves results and reduces overreach
- AI enhancement can be striking, but its colors and details are a plausible guess, so keep the faithful versions alongside it
- The prompt matters: asking an AI for preservation or for enhancement gives very different photographs from the same scan
- The restorer’s role does not disappear. It becomes more important
For a side-by-side test of five current AI image models on a faded 1930s snapshot, see Restoring Family Photos with AI: How Much Is Real?. For what happens when you give AI several poor photos of one person, see Image Compositing with AI.